Water Tanks for Mobile Detailing: The Ultimate Guide
Take your mobile car detailing business to the next level! Explore top water tanks, expert tips, and setup advice to ensure smooth, professional service every time.
Written by:
Parham Koukia
Reviewed By:
Editorial Team
Published: December 03, 2025
Updated: June 29, 2026
Use AI to summarize this article:
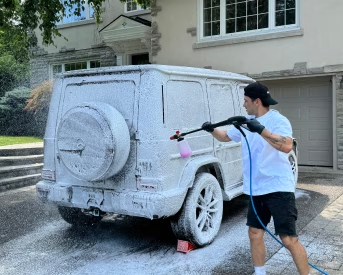
Mobile auto detailers depend on a reliable water supply to get the job done anywhere. Having a dedicated water tank for mobile detailing ensures you can wash and detail vehicles without needing the client’s hose or a nearby spigot.
In this guide, we’ll cover everything you need to know, from choosing the right size detailing water tank to key features, setup tips, and the best tank options on the market. This information is based on my hands-on experience in mobile detailing and the research by our Panda Hub team.
Why You Need a Dedicated Water Tank for Mobile Detailing
A self-contained water supply is practically essential for a professional mobile detailer. It allows you to work anywhere without relying on an on-site water source. Carrying your own water makes you more self-sufficient and efficient, especially for services like full washes, rinsing off soap, cleaning wheels, and more. While some detailers use customers’ water or rinseless wash methods, having your own tank projects professionalism and ensures you’re prepared for any job. In short, properly detailing water tanks gives you freedom and credibility as a mobile detailing business.
What Size Water Tank Do You Need for Mobile Detailing?
One of the first questions is what size water tank is best for a mobile detailing setup. The answer depends on how many vehicles you plan to service between refills and how much water your process uses per car.
Most professional detailers find that a tank in the 50 to 100-gallon range is sufficient for a day’s work. In fact, a 60-gallon or 100-gallon water tank will get you through the day just fine, especially if you are a one-man operation.
Smaller tanks (e.g., 35-50 gallons) may work if you only do 1-3 cars and can refill frequently, whereas larger tanks (80-100+ gallons) allow more cars but come with added weight and space needs.
-
Typical Water Usage: With efficient techniques (like using a pressure washer and shutting off water when not in use), you might use roughly 10-15 gallons of water per car for an exterior wash.
Some professional detailers on Reddit reported that a 65-gallon tank can handle about 3-5 average vehicles before needing a refill. Some have even stretched 65 gallons to 4-8 cars when doing mainly quick maintenance washes.
If your services include heavy cleaning (muddy vehicles, fleet washing) or you plan to do many cars in one go, you’ll need more water capacity.
-
50 Gallon vs 100 Gallon Tanks: A 50-gallon water tank for mobile detailing (~190 liters) is a common starting point for part-time setups or compact vehicles. It provides enough water for a couple of full washes and fits easily in small vans or even car trunks, but you may need to refill during a busy day. On the other hand, a 100-gallon water tank (~380 liters) doubles that capacity and is great for handling multiple details without stopping (ideal for high-volume mobile car wash operations).
Do keep in mind the weight: water weighs about 8.34 lbs per gallon, so 100 gallons of water alone is around 834 lbs (379 kg). Always ensure your vehicle can safely carry the load. As an industry source points out, a larger 330-gallon tank would weigh over 2,700 lbs when full, not practical unless you have a heavy-duty truck or trailer. In fact, if your business is primarily car washing or fleet detailing, you might consider tanks in the 20-300+ gallon range, but only if your vehicle or trailer can support that weight.
-
Weight and Vehicle Capacity: Always match your tank size to your vehicle’s payload. Hauling water significantly adds to your rig’s weight. For example, a 100-gallon tank (834 lbs of water) in a small van or pickup is approaching the payload limit of some vehicles.
Check your vehicle’s load rating and remember that tank weight plus equipment (pressure washer, generator, etc.) all count. If you use a smaller van or even a car, you may need to stick to a smaller tank (50-65 gal) or consider towing a trailer for larger volumes.
-
Refilling vs. Larger Tank: Another strategy is using a moderately sized tank and refilling as needed. If water refill stations or customer water access are readily available in your area, you could save weight by using a ~60-gallon tank and topping up during the day.
Many detailers carry a hose to connect to clients’ spigots when available (at least for refilling buckets or tanks). However, if you want to avoid any mid-job refills and service many cars, err on the side of a bigger tank (within your vehicle’s limits).
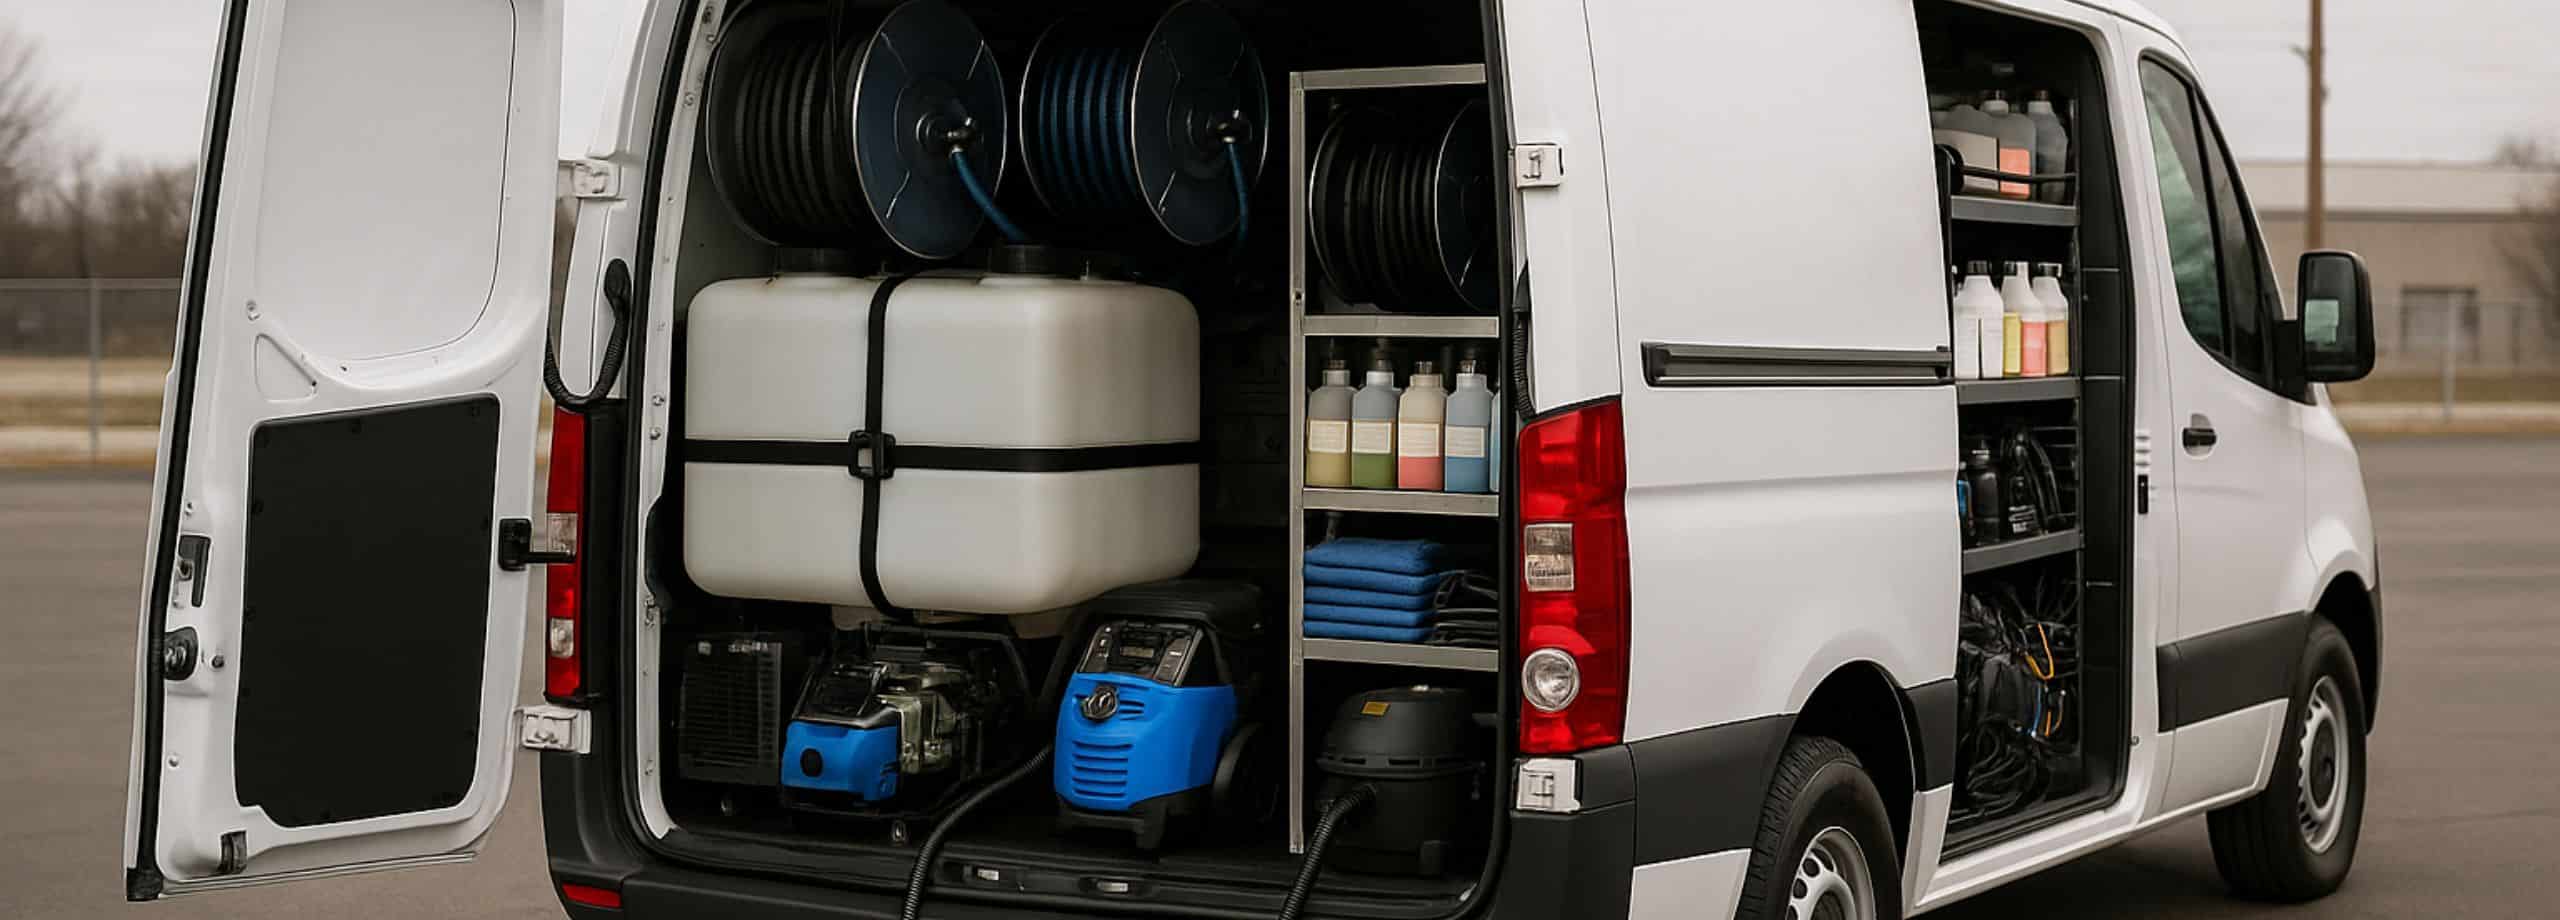
Key Features to Look for in a Mobile Detailing Water Tank
When shopping for the best water tank for mobile detailing, consider the following features and factors to ensure it meets your needs:
1. Capacity and Dimensions:
Ensure the tank’s capacity (in gallons) matches your daily water usage and the physical dimensions fit your vehicle or trailer. Low-profile or rectangular tanks are popular because they maximize volume while keeping a low center of gravity (preventing tipping) and often fit in truck beds or van cargo areas.
For example, Ronco’s popular 90-gallon detailing tank measures about 38.5″ x 26.5″ x 25″, a size that fits in many vans. Always measure your available space (including door opening sizes) before choosing a tank.
2. Material and Durability:
Nearly all detailing water tanks are made of tough polyethylene plastic, which is lightweight, rust-proof, and impact-resistant. Look for tanks described as heavy-duty or UV-stabilized polyethylene. UV stabilization is important because constant sun exposure can encourage algae growth in the water and degrade the plastic over time. Quality tanks are often “UV stabilized for outdoor storage” to prevent algae, which keeps your water clean and protects your pump.
A durable tank will resist cracking or puncturing, even with daily use and vehicle vibrations.
3. Baffling (Slosh Reduction):
Water will slosh around in a partially filled tank, which can make your vehicle unstable during turns or stops. This is especially an issue with larger tanks. To combat this, some tanks come with internal baffles (walls or compartments), or you can add baffle balls to break up the water movement.
If your chosen tank isn’t baffled, try to keep it either very full or securely strapped, and drive cautiously. For big volumes like 100+ gallons, I highly recommend baffling for safety.
4. Inlet, Outlet, and Fittings:
Pay attention to the tank’s plumbing features. Most detailing tanks have a large fill opening on top for filling with water. They will also have a water outlet near the bottom (often a molded or threaded fitting) to connect your hose or pump. Common outlet sizes are 3/4″ or 1″ NPT, which you can adapt to garden hose fittings or your pressure washer feed. Some tanks may include certain fittings or valves, while others come as a bare tank where you install your own.
Make sure the tank either comes with necessary fittings or that compatible fittings are readily available (usually standard PVC or brass plumbing parts). Having a vent or air inlet is important too, as it lets air in while water goes out, preventing vacuum lock and ensuring smooth flow.
5. Ease of Mounting and Security:
In a mobile setup, you must secure the tank firmly so it doesn’t shift or tip during transit. Many tanks targeted at auto detailing have molded grooves or flat areas for use with ratchet straps or brackets. Some even offer specific strap kits or metal bands to hold them down. Check if the tank has built-in mounting points or if you’ll need to build a frame or enclosure.
A fully loaded tank is heavy, so use strong straps (ratchet straps or metal bands) and anchor them to solid points in your vehicle (e.g., bolted to the van floor or truck bed). It’s wise to position the tank against a bulkhead or between wheel wells to minimize movement.
Safety first: a loose 500-pound tank in a van is extremely dangerous in a sudden stop, so secure it as if your life depends on it.
6. Water Quality (Cleanliness):
Using clean water is crucial both for avoiding paint damage (no sediments scratching the paint) and for protecting your pressure washer pump from debris. Look for tanks that are described as food-grade or potable water safe (most polyethylene tanks are). Still, you should use a filter on your tank’s outlet or on the feed hose to your pressure washer. Some detailing equipment suppliers offer filtration systems that attach to the tank to strain out debris and prevent clogged nozzles. Also, consider deionized water or an RO (reverse osmosis) system if you want spot-free rinsing.
At the very least, keep your tank clean: rinse it out periodically and avoid letting water sit for long periods (stagnant water can grow algae or bacteria). Using a tank with an opaque material or UV protection will also help reduce algae growth inside.
7. Portability and Weight Distribution:
Think about how you’ll load and perhaps unload the tank if needed. Smaller tanks (under ~60 gallons) might be light enough (when empty) for two people to carry or reposition. Larger tanks will likely stay installed permanently. If you have a pickup truck, placing the tank close to the cab (over or just forward of the rear axle) gives better weight distribution than at the tailgate. In vans or trailers, center the weight over the axle(s) as much as possible. This ensures stable handling. If using a trailer, secure the tank over the axle and balance your trailer load.
Setting Up Your Mobile Detailing Water Tank (Installation Tips)
Once you have the right tank, proper setup is key for a smooth operation. Here are some tips for installing and using your mobile detailing water tank effectively:
1. Mount it Securely:
As mentioned, always strap or bolt down the tank firmly. If your tank came with strap kits or metal bands, use them. Otherwise, heavy-duty ratchet straps are a minimum. Secure the tank to anchor points (many drill through the van floor or use E-track/load bars in trailers).
For a pickup truck, you can use the bed tie-down hooks or install additional anchor points. In the example image above, the detailer used metal support bands and a DIY wooden frame to keep a 35-gallon tank in place.
2. Gravity Feed vs Pump:
Decide how you will get water from the tank to your pressure washer. Many mobile detailers use gravity feed if the tank outlet can be placed higher than the pressure washer’s inlet. Gravity can supply water as long as there is sufficient height difference and the outlet flow rate is adequate.
Gravity feed works best with gas pressure washers (which tend to draw water on their own) or specially designed electric ones. If gravity alone is not giving enough pressure or your tank must sit level with or below the pump, you will need a 12V transfer pump or a pump built into your pressure washer.
A small on-demand water pump can push water to your pressure washer, ensuring a steady supply. The pump should be rated for at least a few GPM flow. Always prime the pump (make sure water is in the line) and use a filter to avoid damaging it.
Whether gravity or pump, keep hoses short and use at least a 3/4″ diameter feed line to minimize flow restriction.
3. Plumbing Connections:
Connect your tank outlet to your pressure washer inlet using appropriate hoses and fittings. You can also install a shutoff valve at the tank’s outlet, as it allows you to stop the water when needed and easily disconnect hoses. From the valve, a short hose or pipe leads to your pressure washer.
Quick-connect fittings can make it easy to detach the pressure washer or hose for storage.
Use thread sealant or Teflon tape on any threaded connections to prevent leaks. It’s also wise to include a strainer or filter in-line, as noted earlier, to catch any tank debris before it reaches your pressure washer.
4. Preventing Leaks and Spills:
During transit, even with baffles, water can splash. Make sure your tank’s lid is tight, and any vents won’t slosh water on turns. If your tank is full, some water might spill out the vent or cap if not sealed. Leaving a little air space can help.
If using an open vent, you can attach a hose or small breather filter to direct any overflow downward. Regularly inspect all hoses and fittings for leaks, especially as you drive on bumpy roads, which can loosen connections over time.
5. Maintenance:
Treat your water tank as part of your equipment maintenance routine. Refill with clean water whenever possible. If you must use well water or uncertain sources, consider adding a filter at fill time too. Drain and rinse the tank every so often to clear out sediment.
In hot weather, avoid letting water sit for too long (to prevent microbial growth).
In cold climates, winterize your tank if not in use. Drain it completely and run RV antifreeze through pumps and hoses, or keep the setup in a heated area, because a hard freeze can crack the tank or damage the pump. Also, check straps and mounts periodically to ensure they remain tight and not weakened by strain.
6. Using On-Site Water (Backup Plan):
Even with a tank, it’s smart to have a backup plan for water on long days. Carry a garden hose so that if a customer is willing to let you tap into their water, you can connect and either refill your tank or bypass it to feed your pressure washer directly. This can be a lifesaver if you underestimated water usage for a series of jobs. Just remember to bring a variety of faucet adapters (some homes have different spigot sizes).
Utilizing on-site water when available can reduce how much you need to carry in your tank, saving weight and refilling stops. That said, never assume it! Your tank is there, so you don’t have to ask the client for water in most cases.
Most Recommended Water Tanks for Mobile Car Detailing
Below are some of the best water tanks that mobile auto detailers trust:
1. Ronco 60-Gallon Detailing Water Tank:
Ronco Plastics is a well-known manufacturer of tanks for detailing and RV use. Their 60-gallon poly tank (model AD9407) is widely used by mobile detailers with limited space. It measures about 43″ x 28″ x 16″ (a low-profile design) and is praised as “the perfect auto detailing water tank for mobile detailers who have limited space in their van, trailer, or rig.”
Despite the compact size, 60 gallons is enough for a full day of detailing for most solo operators. The tank features a large 8″ top manway, a 3/4″ bottom outlet, and a vented inlet, and it’s built from durable, made-in-USA polyethylene. If you’re outfitting a smaller van or even a sedan-based setup, this tank offers a great balance of capacity and footprint.
2. Ronco 90-Gallon Tank:
For those who can handle a bit more volume, Ronco’s 90-gallon tank is extremely popular. It measures 38.5″L x 26.5″W x 25″H, so it’s taller than the 60-gal but still fits in most vans and pickups. This size gives you that extra buffer to comfortably do 5+ cars per fill.
The 90-gallon is a top choice for professional rigs and often comes with optional strap kits for secure mounting. Like the 60, it’s a robust polyethylene build. If you have the space and payload for it, the 90-gallon ensures water is the last thing you’ll worry about on the job.
3. Ralda’s 80-Gallon Mobile Detailing Tank:
Raldas is a brand catering to mobile detailers, and their 80-gallon tank is a high-quality option. This tank is designed to be rugged and convenient for detailing work. With an 80-gallon capacity, it allows you to detail multiple vehicles without refilling, ensuring maximum efficiency.
It’s made of heavy-duty plastic and sized to fit most van/truck setups (dimensions roughly 44.5″ x 22″ x 20.5″). The Raldas tank has a 3-inch fill port and both 3/4″ and 1/2″ threaded ports for drainage and hose hookup, making it easy to integrate with pumps and pressure washers.
Users like that it’s a turn-key solution for a professional setup, especially when paired with mounting frames or skids. If 60 gallons feels a bit tight but 100 is too heavy, an 80-gallon like this can be a perfect middle ground.
Also Read: How to Start a Mobile Detailing Business
Conclusion
A well-chosen water tank can be a game-changer for your mobile detailing business. It grants you independence and professionalism by ensuring you always have a sufficient, clean water supply on hand.
To recap, evaluate your daily water usage and vehicle capacity to decide on the right tank size. Many detailers thrive with 50-100 gallon tanks, balancing convenience and capacity. Pay attention to build quality, dimensions, and features like UV protection and baffles, as these will impact the tank’s performance and safety. Install the tank securely and integrate it with your pressure washing setup, whether by gravity feed or pump, so that your workflow remains smooth and efficient.
By investing in a quality mobile detailing water tank and setting it up properly, you’ll be equipped to deliver top-notch car detailing services anywhere your customers need you. No more worrying about where to get water or running out mid-job, as your mobile rig will be a fully self-contained car care station.
With the information in this guide, you can confidently choose the best water tank for your mobile detailing needs and set yourself up for success in the detailing business.
Happy detailing!

Parham Koukia
Lead Car Detailer / Operations Manager
With nearly 15 years of hands-on detailing experience, Parham has become a trusted authority in the auto care world. His work is regularly spotlighted in leading outlets like CNN, GoBankingRates, and Family Handyman. Parham likes to share his knowledge to offer in-depth tips on equipment selections, seasonal car care, and some secret car cleaning tips used by detailers in the real world!
Read more


